
You—Yes, You—Can Build This Simple Stool in a Weekend
Jeff Waldman, author and the mind behind the website Elevated Spaces, where he sells plans for his simple DIY builds, first came upon the Ulm stool in The Atlas of Furniture Design. The project caught his eye due to its simplicity and attainability. Originally conceived by Max Bill, founder of the Bauhaus-offshoot Ulm School of Design, the stool was designed to make use of surplus construction materials. For Waldman, the appeal of the project was not just its good looks, but the opportunity to explore box joints as a joining method—slightly less complicated than the dovetail joints used in the original design.
"The original design had boards dovetailed together and beech feet affixed to the bottom, which was more than I was interested in trying," he says. "The basic idea and proportions seemed easy enough to explore." He tinkered with a few options before settling on the finished product and has since made several, noting, "I’ve mostly gifted them to friends and family since they’re so cheap, easy to produce, and useful."
The stool is simple enough to be built in an afternoon, and it can be used as a side table, a tray for transporting books or other objects, or a stool with a variety of heights. In short: It’s an excellent project for a first-time woodworker eager to get their hands dirty.
Though the instructions might seem complex or daunting, Waldman urges you to not let that stand in the way of playing with the design. "Learn by doing and making a thing. Cut three lengths of pine board or plywood and screw and glue the top down onto the legs and put a screw through each leg into the end of a dowel. Build some confidence, do better next time, and relegate the old one to plant-stand duty."
If you’re feeling ready and confident to tackle this project head-on, here’s what you'll need to do.
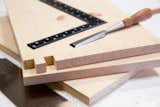
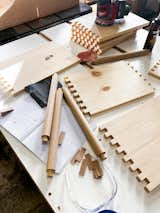
Prep your materials
Cut boards and dowel down to length
Cut the pine board into two 17.5" pieces for the legs. Cut one 15.5" piece for the seat. Cut your dowel to 16.5"
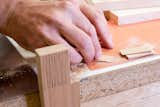
Prep the boards for cutting the box joints
X marks the spot (where you will remove the wood for your finger joints).
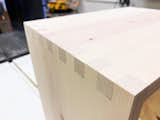
- To lay out the "fingers" for the box joints, draw the same pattern on all three pieces you just cut: Draw a line 3/4" from the end of the board, then mark that space into 15 evenly-spaced 3/4" squares.
- Draw an X in the squares you plan to remove. (In woodworking, this area is called your waste.) Lay out the legs and seat together so you can be sure you’re creating an interlocking pattern. The legs should have "fingers" on the edges and the seat should have opposing voids on its edges, ensuring that the fingers of the seat and legs will interlock.
Make the cuts and drill the holes
If you’re using a table saw: Set up a table saw dado (a wide stack of blades) to cut 3/4" wide by 3/4" tall. Using a sled for your table saw, cut out the marked spaces on both leg pieces and the seat piece. (There are tricks to make this process more accurate and efficient, which will also save you the hassle of drawing all the pencil lines, and Waldman suggests watching a few videos online to find one that works best for you.)
- If you’re using a hand saw: Saw along the lines you made while keeping the saw blade on the inside edge of the waste. Then use a chisel and a mallet to remove the wood between your saw cuts. You can also fit the narrow blade of a coping saw in there to reduce a lot of chiseling effort.
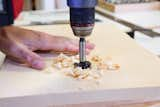
- Using the 1.25" forstner bit, drill an ⅛" deep hole on the outside face of each leg, centered and 4.5" from the bottom.
- Then use the ¾" bit to drill another hole in the center of the first hole, this time going all the way through. (Use backing wood so that when the drill bit exits the wood doesn’t splinter.) This will create the hole and shoulder for the dowel that joins the legs.
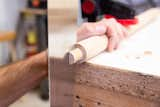
Making the shoulder and notching at the end of the dowel
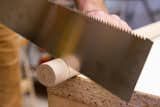
Cutting the ring at the end of the dowel.
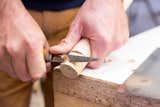
Reducing the end of the dowel by hand, with just a pocket knife and some elbow grease.
Next, reduce the ends of the dowel so that it can pass through the ¾" hole. A table saw or lathe can be useful here, but you can do the whole thing with a hand saw and a pocket knife.
- Cut a ¼" deep ring with the saw 1⅛" from each end of the rod and then shave the wood off to the saw cut, creating a ¾" round dowel on the ends.
- Once the ends are reduced, saw into the ends of the dowel, perpendicular to the lines of the grain, down to the shoulder, so that you can eventually glue a wedge in there once it’s in place.
Prepping the end of the dowel for the wedge.
Making the wedges
Cutting the wedges for the dowel.
To make the wedges, any piece of ¾" wide hardwood will do. You can make them with a jig on a table saw or bandsaw, but they can also be made with a handsaw and some sandpaper. They shouldn’t be too thick—just enough to force a bit of expansion when driven into the notch you sawed.
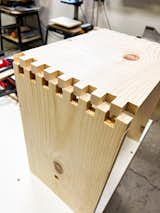
Putting it all together
Time to build a stool!
Once all the pieces are cut, it’s time to assemble and glue.
Dry fit it first to make sure that everything looks good and fits properly. Once you’re confident that the pieces will fit together, apply wood glue to join the seat and the legs.
Make sure everything fits how it should BEFORE you glue!
Insert the dowel into the two holes you made in the legs with the notch for the wedge parallel to the ground, and hammer the wedges into the ends of the dowels with a little bit of glue.
Make sure all the corners are square and the wedges are hammered in securely. Wipe off any excess glue with a damp rag.
Here’s your stool, sanded and glued.
Clamp the legs from the outside and let the stool dry for 24 hours. After a day, unclamp the stool and saw the dowel ends and wedges flush with the legs. Sand the stool to finish and enjoy. You made a stool!
More DIY inspiration:
You Can Build This Tiny A-Frame Cabin With $3,000 and One Weekend
Whether You’re a Skilled Craftsman or DIY Newb, You’re Going to Want This Book on Your Shelf
This DIY Couple Craft a Tiny Cabin in the Santa Cruz Mountains for Less Than $35K
Published
Last Updated
Get the Dwell Newsletter
Be the first to see our latest home tours, design news, and more.