
At a Glance
Experience
- You don’t need a ton of know-how.
- Mostly some core strength and a shovel.
Budget
- You’ll be able to knock this out with basic tools.
- Whatever you choose for fire pit blocks will be relatively cheap.
Time
- Grab a friend and knock this out in a matter of hours.
"Fire is a hearth, a beacon, a message, a gathering point," says landscape architect Anooshey N. Rahim of Dune Hai. "Its elemental chemistry is so deeply embedded in our DNA that no watcher of the flame is left not mesmerized." The heart of any outdoor space, fire pits have the additional benefit of being fairly simple to build yourself.
Fire pits can vary tremendously in style, size, and material, from pre-made options to DIY kits to custom-designed models. As Lynn Berney and Tracy Gould of LT Design point out, "There are numerous types of fire pits to fulfill different needs; these options can be grouped into four different categories: wood-burning fire pits, propane fire pits, gel fuel fire pits, and natural gas fire pits."
Since they require little in the way of infrastructure and don’t rely on gas tanks or natural gas lines, wood-burning fire pits are the easiest to tackle on your own. Here, we take you through the steps of building your own recessed fire pit to gather around on chilly evenings.
1. Check Your Local Guidelines
Before breaking ground, review any regulations or codes your municipality may have regarding outdoor fire pits. You may find that there are requirements for setbacks from property lines or buildings, for example.
Because wood-burning fire pits tend to be more difficult to control, an open flame is certainly not appropriate for heavily wooded areas, dense neighborhoods, or many parts of California, where the threat of unintentionally starting a wildfire is very real, notes Rahim.
2. Determine the Right Location
Find a relatively flat area for your fire pit so that you can ensure a stable, level foundation. "Having the proper foundation for your fire pit is the key to having it last for a long time," explains Bill Samuel of Blue Ladder Development, a licensed contractor and real estate developer specializing in home renovations.
You’ll want to make sure that the fire pit is at least 10 feet away from any buildings for safety, and you’ll also need to avoid tree roots and canopies. Find out about the prevailing winds in your area, which can help you figure out the direction that smoke will likely travel.
Architect and landscape architect Mary Barensfeld advises that you consider sight lines in the placement of the fire pit as well. For a backyard design overlooking the San Francisco Bay, she created a series of cascading wood decks, concrete terraces, a plunge pool, and a fire table from Concreteworks. "It was important to me to have the fire table visible to the client from inside, so situating the flame without the house sight lines made sense," she says.
3. Choose a Size and Shape
"A fire element that is too small becomes a precious, finicky piece of furniture while too large of a fire element threatens to overtake all other elements of the design," says Barensfeld. To determine the best fire pit size, make sure your fire ring or bowl fits comfortably inside it, and consider its scale in relation to the overall space as well as the number of people you want it to accommodate—within reason. "Remember," says Rahim, "the bigger the wood fire, the more smoke."
4. Mark the Dimensions

After you’ve checked local guidelines, scoped out a site, and chosen a general size and shape, use marking paint to draw the dimensions of your future bonfire.
Using marking paint, a tape measure, and someone to help you hold the other end of the tape—a good opportunity to enlist the kids—outline the exact location and dimensions of the fire pit.
5. Clear and Excavate the Area

Time to start digging—four to six inches below the ground should do it.
Remove grass, sod, rocks, and topsoil from the area you’ve marked and excavate the pit. "Most basic fire pits are fine with a compacted gravel base that sits four to six inches below the surrounding surface," advises Samuel. "However, if you’re building a larger or heavier structure, you should make sure that the foundation is going to be strong enough to support the structure and prevent movement through freeze and thaw cycles."
6. Create an Even Surface

Tamp down the earth to create an even surface for the gravel bed. Bonus points if you use a level to make sure everything's good to go.
Tamp down the area you’ve just excavated, firmly packing down the earth. You want to ensure you’re creating a compact and level surface for your next step; Joe Raboine, director of residential hardscapes at Belgard, recommends using a level in all directions to confirm you’ve created a stable and evenly packed area that will serve as a bed for your gravel.
7. Compact the Gravel
Add a layer of gravel about one to two inches thick and use a tool like a rake to flatten and spread the gravel, shifting it around as needed to create a flat, packed surface; add some water to aid in compaction for finer sized gravel. "The final elevation of the gravel should be about four inches below the finished height of the surrounding landscape," says Raboine.
8. Lay Down Your Blocks
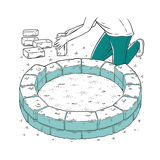
Start building courses with your blocks, tapping down any wayward units with a rubber mallet. Make sure to stagger the joint locations as you stack them up, and test that your fire ring or bowl still fits as you go.
Place your stone, firebrick, or paver units in the form you’ve designated, whether it be a circle, oval, square, or rectangle. Make sure the material is fire-resistant: Regular clay bricks, for example, can crack at high temperatures while firebricks are denser and have been kilned to withstand higher temperatures.
Once you’ve placed your first course of blocks, use the level again to ensure that they’re in line with each other. Tap down any wayward units with a rubber mallet.
9. Test the Fit of Your Fire Ring or Bowl
Make sure that your fire ring or bowl fits within the enclosure you’ve created. Adjust the size as necessary.
10. Complete the Courses
Continue laying down your blocks until you’ve built at least three or four vertical courses—enough to fill the four-inch recess you’ve created and jut out above the adjacent landscape. This not only visually defines the fire pit, but also ensures that debris and other potentially dangerous materials don’t escape the boundaries. After each course, check to make sure that your fire ring or bowl still fits.
The blocks on your second and third courses should have alternating joint locations so that you do not have joints aligning vertically, and you may want to use caulk or some other kind of construction adhesive to bind the units together. Make sure, however, to leave some gaps along the walls of the upper courses—usually one per side is sufficient—to act as air holes that will feed air to the fire.
11. Place Your Fire Ring or Bowl

You’ll want to leave some gaps for air to flow through in your upper courses, which should just peek out above the ground. Once you install the fire ring or pit, all that’s left to do is gather the kindling.
Congratulations—you’re on to the finishing touches! Set the fire ring or bowl into place. Once you’ve let the adhesive cure for the recommended time, you’ll be ready to kindle the fire.
Related Reading: The Beginner’s Guide to Growing Your Own Vegetables
Published