Project posted by Spiral Cone Legs

Classic GMC Motorhome Repurposed for Elder Care

Year
2017
Uh Oh, what have  I gotten myself into?
A forty plus year old vehicle will likely need more than just the interior worked on. Among many smaller repairs, I had the oldsmobile 455 engine and turbohydromatic 425 transmission rebuilt locally. I also had the final drive swapped for one with limited slip and also lower gears for better hill climbing while towing. Once the mechanic had removed the engine and trans, I had the vehicle towed back home so I could continue working on the interior, while the engine and trans were rebuilt.

The vehicle has ample power and handles well for something this big, I actually enjoy driving it.
Uh Oh, what have I gotten myself into? A forty plus year old vehicle will likely need more than just the interior worked on. Among many smaller repairs, I had the oldsmobile 455 engine and turbohydromatic 425 transmission rebuilt locally. I also had the final drive swapped for one with limited slip and also lower gears for better hill climbing while towing. Once the mechanic had removed the engine and trans, I had the vehicle towed back home so I could continue working on the interior, while the engine and trans were rebuilt. The vehicle has ample power and handles well for something this big, I actually enjoy driving it.
Now it's starting to look like progress.
Look at that exposed structural aluminum frame supporting both aluminum and fiberglass outer skin panels, how could this be a gutted motorhome? you'd think you were looking at a gutted aircraft hull.

I covered the floor with a layer of 1/4" baltic birch plywood, glued and stapled, over this I installed linoleum.

From here you could build one of these out for any number of purposes, motorhome, work van, small bus, ambulance, mobile studio etc. The techniques I will describe could be used and no doubt improved upon for all manner of applications.
Now it's starting to look like progress. Look at that exposed structural aluminum frame supporting both aluminum and fiberglass outer skin panels, how could this be a gutted motorhome? you'd think you were looking at a gutted aircraft hull. I covered the floor with a layer of 1/4" baltic birch plywood, glued and stapled, over this I installed linoleum. From here you could build one of these out for any number of purposes, motorhome, work van, small bus, ambulance, mobile studio etc. The techniques I will describe could be used and no doubt improved upon for all manner of applications.
Roof and Exterior,
Before we go any further, let me explain my criteria for every decision made here, which were always for function and speed of construction. It was important that I get this project together in a timely manner so Neal could start benefiting from it's use. I wasn't aiming for pretty, and in some places it shows, particularly where the exterior is concerned.

I removed the old roof vents, roof ac, storage pod, cargo rack etc and removed the top side rails to expose the body seam that lies underneath. I covered the seams and patched all the old holes with roof sealant tape tape. 
I chose the solar panels to fit as much as I could between the two roof vents, I mounted them with simple z brackets and 1/4" bolts through the aluminum roof skin to fender washers and nylock nuts on the inside. I also mounted an in motion satellite tv antenna, new ventilators, and a cell booster antenna.
Roof and Exterior, Before we go any further, let me explain my criteria for every decision made here, which were always for function and speed of construction. It was important that I get this project together in a timely manner so Neal could start benefiting from it's use. I wasn't aiming for pretty, and in some places it shows, particularly where the exterior is concerned. I removed the old roof vents, roof ac, storage pod, cargo rack etc and removed the top side rails to expose the body seam that lies underneath. I covered the seams and patched all the old holes with roof sealant tape tape. I chose the solar panels to fit as much as I could between the two roof vents, I mounted them with simple z brackets and 1/4" bolts through the aluminum roof skin to fender washers and nylock nuts on the inside. I also mounted an in motion satellite tv antenna, new ventilators, and a cell booster antenna.
Ceiling and walls,
In addition to the ribs, gm also provided a tang at the top and bottom of the walls and on either edge of the ceiling, that were used with 1/8 plywood door skins that were captured by these and popped into place. I wanted thicker material more solidly mounted to the body, to which I could mount lights and other things. So I didn't use the tangs and instead mounted plywood to the ribs with 10-24 screws. A drill bit in one cordless drill and a tap in another, I would drill and tap right through the wood and into the 1/8" aluminum flange and install a screw. I used pre finished 1/4" birch plywood for the walls and 3/8" bender board for the ceiling.
Ceiling and walls, In addition to the ribs, gm also provided a tang at the top and bottom of the walls and on either edge of the ceiling, that were used with 1/8 plywood door skins that were captured by these and popped into place. I wanted thicker material more solidly mounted to the body, to which I could mount lights and other things. So I didn't use the tangs and instead mounted plywood to the ribs with 10-24 screws. A drill bit in one cordless drill and a tap in another, I would drill and tap right through the wood and into the 1/8" aluminum flange and install a screw. I used pre finished 1/4" birch plywood for the walls and 3/8" bender board for the ceiling.
I removed and rebuilt the the windows with new rubber and reinstalled them with rtv, which is more permanent than I would like, but it allowed me to eschew the original window retaining hardware and plastic window casings. Here's what I did, I installed the plywood on the interior wall and then cut out the window opening with a router and pattern bit, running the router bit bearing directly on the aluminum window frame, this worked great.
Panels Panels Panels,
I built all the panels, every shelf, counter, dividing wall etc. as a
stressed skin panel. These are a composite of 1/4" plywood and eps foam.

A stressed skin panel is an incredibly efficient engineered scheme, in which the structural material is only placed where it can do the most good. I have made benches, tables, this motor home interior, and a 4000 sq/f building, from stressed skin panels of various types. I believe that most of the panels in the world would be better served if they were built as stressed skin panels. Here in particular it is great to have such strength without so much mass, a motorhome is heavy enough already.

I am already set up for making these particular panels because my wife and I make these upholstered benches and sell them at our website, SpiralConeLegs.com I make the bench panels and the legs and she does the upholstery. 

A stressed skin panel consists of a structural skin and a lightweight rigid core, like a surf board, hollow core door, or airplane wing.

I make these panels with 1/4" plywood, 2lb density eps foam and wood glue.

Along all exposed edges, or anywhere I foresaw the need for an anchor, is solid plywood. This makes for a robust solid wood edge with that beautiful birch ply edge grain and makes for internal solid anchor points for later assembly.
Panels Panels Panels, I built all the panels, every shelf, counter, dividing wall etc. as a stressed skin panel. These are a composite of 1/4" plywood and eps foam. A stressed skin panel is an incredibly efficient engineered scheme, in which the structural material is only placed where it can do the most good. I have made benches, tables, this motor home interior, and a 4000 sq/f building, from stressed skin panels of various types. I believe that most of the panels in the world would be better served if they were built as stressed skin panels. Here in particular it is great to have such strength without so much mass, a motorhome is heavy enough already. I am already set up for making these particular panels because my wife and I make these upholstered benches and sell them at our website, SpiralConeLegs.com I make the bench panels and the legs and she does the upholstery. A stressed skin panel consists of a structural skin and a lightweight rigid core, like a surf board, hollow core door, or airplane wing. I make these panels with 1/4" plywood, 2lb density eps foam and wood glue. Along all exposed edges, or anywhere I foresaw the need for an anchor, is solid plywood. This makes for a robust solid wood edge with that beautiful birch ply edge grain and makes for internal solid anchor points for later assembly.
In case you were wondering about the strength of a panel made of foam and thin plywood.
This 5-foot bench panel with over a thousand pounds of gravel on it, uses 1/4 as much tree to create, yet has the comparable strength of a 2 inch thick solid wood slab. The panel itself weighs less than 12 pounds yet is a structural beast!
In case you were wondering about the strength of a panel made of foam and thin plywood. This 5-foot bench panel with over a thousand pounds of gravel on it, uses 1/4 as much tree to create, yet has the comparable strength of a 2 inch thick solid wood slab. The panel itself weighs less than 12 pounds yet is a structural beast!
Neal has good and bad days, and as his condition has declined, a bad day now means he is incapable of walking, so I added this aluminum ramp, so if necessary, I can wheel him in or out with a wheelchair. The ramp folds lengthwise and will stow on the rear bumper.
The back area converts from a double bed into a dinette.

You fold the center bed panel in half via a piano hinge and lift and place it onto the wall brackets and prop the other side with a leg which stows in the overhead shelf.

This rear dinette arrangement makes sense to me because of the compartment wells on either side of the rear of the rig, which are under the seats of the dinette.

I'm a big fan of the appearance of fine plywood edge grain. Even though I'm not aiming for pretty, a lot of what I've done here looks good. If you aim for looks before function, you will likely get neither, but if you aim for function first, the end result will rarely look bad, and more often than not it will look quite nice.
The back area converts from a double bed into a dinette. You fold the center bed panel in half via a piano hinge and lift and place it onto the wall brackets and prop the other side with a leg which stows in the overhead shelf. This rear dinette arrangement makes sense to me because of the compartment wells on either side of the rear of the rig, which are under the seats of the dinette. I'm a big fan of the appearance of fine plywood edge grain. Even though I'm not aiming for pretty, a lot of what I've done here looks good. If you aim for looks before function, you will likely get neither, but if you aim for function first, the end result will rarely look bad, and more often than not it will look quite nice.
Power!
I wanted to use a regular electric refrigerator for ease of operation and to avoid damage from less than level parking, like in our driveway, so I made as big a system as I could, or was willing to fit.

Two, 340 watt solar panels, you can never have too many solar panels, and here it is a matter of how many can you fit along with other things competing for roof space.

Four L16 batteries, again, where to stop 2,4,6,8? 4 of these weigh 460 pounds and they are big, so I stopped at 4

A 4000 watt pure sine wave inverter that puts out 110/220 vac with built in automatic transfer switch and 115 amp battery charger. It's charger/switch requires a 220v input, so I also installed a separate 110v powered battery charger so I can hook up to either 110 or 220v shore power. the inverter's output hooks up to a regular household circuit panel with both 110 and 220 breakers. There are no 220v loads on board but I can steal juice from the motorhome to help power other things, like my cabin in the woods.

The main electrical compartment is also the platform for Neal's bed, the mattress flips up and leans against the wall and the cabinet top leans similarly on a piano hinge.
Power! I wanted to use a regular electric refrigerator for ease of operation and to avoid damage from less than level parking, like in our driveway, so I made as big a system as I could, or was willing to fit. Two, 340 watt solar panels, you can never have too many solar panels, and here it is a matter of how many can you fit along with other things competing for roof space. Four L16 batteries, again, where to stop 2,4,6,8? 4 of these weigh 460 pounds and they are big, so I stopped at 4 A 4000 watt pure sine wave inverter that puts out 110/220 vac with built in automatic transfer switch and 115 amp battery charger. It's charger/switch requires a 220v input, so I also installed a separate 110v powered battery charger so I can hook up to either 110 or 220v shore power. the inverter's output hooks up to a regular household circuit panel with both 110 and 220 breakers. There are no 220v loads on board but I can steal juice from the motorhome to help power other things, like my cabin in the woods. The main electrical compartment is also the platform for Neal's bed, the mattress flips up and leans against the wall and the cabinet top leans similarly on a piano hinge.
I installed a security camera from nest to keep an eye on Neal, like when I'm in a store and he's in the gmc in the parking lot. I also use these in the home for the same purpose and they are a life saver. I can see from my phone that he's ok, it also alerts me when there is motion. The camera connects to a network provided by a cell type internet device, I don't have this one camera on the cloud storage plan so as to save on bandwidth. I installed a roof antenna and powered cell booster for connectivity for the camera.
Neal's chair is from a late model toyota mini van, and chosen because it has a recliner function and built in seat belts, Neal needs to elevate his feet for medical reasons. I built a simple steel base and topped that with a seat swivel that I modified to have two locking positions, one facing forward and one rearward for watching tv.

The lights are all led's, four small puck lights that are on one circuit that cover everything that Neal would need , (chair, bed, bathroom), these are controlled by two way switches at both Neal's chair and bed, he can turn the lights on or off from either location. I also placed two big flat panel lights which provide entirely too much light, in case I need a lot of light, I'm think for something like bandaging a wound or something, I rarely use these. There is also a small light that I can reach from over my shoulder when in the driver seat with a switch right on it, and two more lights in the back bedroom.
Neal's chair is from a late model toyota mini van, and chosen because it has a recliner function and built in seat belts, Neal needs to elevate his feet for medical reasons. I built a simple steel base and topped that with a seat swivel that I modified to have two locking positions, one facing forward and one rearward for watching tv. The lights are all led's, four small puck lights that are on one circuit that cover everything that Neal would need , (chair, bed, bathroom), these are controlled by two way switches at both Neal's chair and bed, he can turn the lights on or off from either location. I also placed two big flat panel lights which provide entirely too much light, in case I need a lot of light, I'm think for something like bandaging a wound or something, I rarely use these. There is also a small light that I can reach from over my shoulder when in the driver seat with a switch right on it, and two more lights in the back bedroom.
The original over head cabinets actually blocked the upper portion of the vehicles marvelous large windows, just terrible.
So I built these shelves instead, Plastic bins on a shelf, no doors, very simple, fast and functional.
The original over head cabinets actually blocked the upper portion of the vehicles marvelous large windows, just terrible. So I built these shelves instead, Plastic bins on a shelf, no doors, very simple, fast and functional.
I needed a rather narrow shower pan, I found one that that was close enough, with modification, to save me from making my own. I glued it to a piece of plywood with spray foam and built up one side with laminated plywood and bondo and then sliced it to a smaller width removing the turned up edge, with a circular saw, this gave it a sturdy finished edge.
To conserve space and to meet Neal's needs, we needed a wet bath with as low an entry as possible, A wet bath is one with the toilet doubling as the shower seat.

I placed the bathroom on the side at the smaller rear window, which is in between the wheel wells.

Bathrooms are inherently complicated because of all the plumbing, I simplified this greatly by using a purchased composting toilet. This saved me from having to add a black water tank and macerator, I refuse to have one tank for both black and grey water, if you poop in it you cannot dispose of it as easily.

The interior of the bath is lined with frp to increase water resistance. the shower head bar is also a safety grab bar that is centered in front of the toilet.
To conserve space and to meet Neal's needs, we needed a wet bath with as low an entry as possible, A wet bath is one with the toilet doubling as the shower seat. I placed the bathroom on the side at the smaller rear window, which is in between the wheel wells. Bathrooms are inherently complicated because of all the plumbing, I simplified this greatly by using a purchased composting toilet. This saved me from having to add a black water tank and macerator, I refuse to have one tank for both black and grey water, if you poop in it you cannot dispose of it as easily. The interior of the bath is lined with frp to increase water resistance. the shower head bar is also a safety grab bar that is centered in front of the toilet.
Well, How Does It Work? Was It Worth the Effort?

This was a large project and I certainly wondered at times whether it was the right thing to be doing. It was Neal's money and my labor, a not insignificant amount of each, and until it was largely complete, it was of no benefit to him.

Now that we are using it, those fears are long gone. It is absolutely wonderful, it frees me to leave the house without leaving Neal alone at home, or having him simply sitting in a regular car seat without entertainment or facilities. It is easier for Neal to get in and out than a regular car or truck, primarily because of the low floor and full height door. The floor is much lower than most motorhomes, as the original promo material said, you don't have to climb to get into a gmc, you step into it.

Even for errands around town or doctors appointments, it is the vehicle of choice. We have everything we need. Need to use the toilet? it's right there, change of clothes, take a nap, shower, watch tv, eat dinner, hell we even have ice. It is of particular value when we are at the cabin where a trip to town is an all day affair, I think without this vehicle, the cabin would simply be unfeasible. It is quite adaptable and I will continue to add things as needed, for instance the wheel chair ramp is the latest addition.
Well, How Does It Work? Was It Worth the Effort? This was a large project and I certainly wondered at times whether it was the right thing to be doing. It was Neal's money and my labor, a not insignificant amount of each, and until it was largely complete, it was of no benefit to him. Now that we are using it, those fears are long gone. It is absolutely wonderful, it frees me to leave the house without leaving Neal alone at home, or having him simply sitting in a regular car seat without entertainment or facilities. It is easier for Neal to get in and out than a regular car or truck, primarily because of the low floor and full height door. The floor is much lower than most motorhomes, as the original promo material said, you don't have to climb to get into a gmc, you step into it. Even for errands around town or doctors appointments, it is the vehicle of choice. We have everything we need. Need to use the toilet? it's right there, change of clothes, take a nap, shower, watch tv, eat dinner, hell we even have ice. It is of particular value when we are at the cabin where a trip to town is an all day affair, I think without this vehicle, the cabin would simply be unfeasible. It is quite adaptable and I will continue to add things as needed, for instance the wheel chair ramp is the latest addition.

Details

Smart Home Tech
Nest

Credits

From Spiral Cone Legs

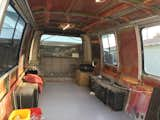
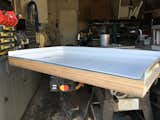
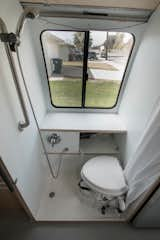
I gutted the interior of a 1976 gmc motorhome and built my own, this was done to aid in caring for my uncle Neal who has dementia and diabetes.
As far as I am concerned, the gmc motorhome was the single greatest thing that general motors ever created. It's features were ahead of it's time for any vehicle, let alone a motorhome. These included, lightweight jet age construction, low center of gravity, front wheel drive and many more, it is truly a shame that they stopped production after just five years in 1978.

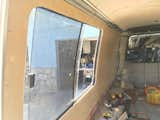
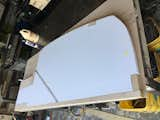
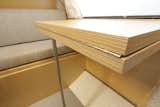
Of the vehicles numerous features, there were two that mattered most to me for this project. One being the low step into the vehicle, for Neal who has difficulty walking. The other being the fact that the gmc, not only has a proper automotive body, but one that was intentionally built to have it's interior finished by non heavy industry third parties. Including a structure of aluminum ribs that have generous flanges for interior use that fit within the confines of 4'x8' sheet goods.

Let me restate that, It's as if General Motors built this thing just for me, or anyone, to make your own interior using normal construction materials.